Sunday, October 27, 2019

Rumi's Protégée: Synopsis


Ahmed Sarym's synopsis of "Rumi's Protégée"

"In sheer isolation, a guy fully clothed in a shower transports to a parallel universe immersing himself in dance before he is interrupted by a call from his mother. He changes into his uniform for school, joins his family on the dining  table for breakfast but the clamour and constant arguments makes him walk away with his bag to the car

His father joins him and no dialogue is shared throughout the ride to school. He gets off and enters the school but realizes he forgot his bag in the car.

He goes outside but sees his father driving off with another woman. He wants to transport back but is unable to, so he physically runs and escapes from reality."


Monday, October 21, 2019

Film Idea: Rumi's Protégée

That's the title our Director, Ahmed Sarym came up with.

"Rumi's P
rotégée", a lot of thought went into making the film title.

The main source of inspiration has to be the 13th century poet and philosopher, "
Jalāl ad-Dīn Muhammad Rūmī". The "Sema" is a famous Sufism ritual and dance that originated from the hammering of a goldsmith.

Rumi was once approaching a goldsmith and the sound of a hammer felt melodic to him. It caused him to feel dizziness after doing a whirling dance synced with the "melody" of the hammer. The dizziness caused Rumi to fall into a trance and become ecstatic. Soon, the sound of the hammering gold vanished and all that was left was this sense of spirituality.

The Sema and Rumi play a large role in our film project as the protagonist of our film opening will be shown as a reborn apprentice of Rumi that uses a variant of the Sema to lose himself into a trance and transport to his imaginary world

Other inspirations included were:
  • Inner Worlds, Outer Worlds (2012)
  • Waking Life (2001)
  • Boyhood (2014)


Thursday, October 10, 2019

Our roles


These are our decided roles for the film opening project.

I'm responsible for the editing and sound design and am doing the camerawork alongside Fatima Ali.

I'll be doing all the editing and post-production in Adobe Premiere Pro.

Fatima will be helping me out with cinematography and deciding what creative shots and techniques to use and when.

Thursday, October 3, 2019

Preliminary Exercise: Point Lighting


Today in class we were being taught the absolute basics of Lighting and Point Lighting specifically. My Media Studies teacher, Sir Nadeem Zulfiqar, started off by switching off all the lights in the classroom and told a handful of students to switch on their phone torches. Point Lighting is the most common form of lighting found in studios and 3-point lighting is the standard that's adopted by most studios.

In a 3-point lighting system, the "Key Light" is the main source of illumination for the subject. It's the brightest light source that is used on set.

 The "Fill Light" is the second source of illumination on set. Its brightness is usually around 60% of the Key Light's brightness and is used to fill in the harsh shadows that are left by the Key Light. Fill Lights are almost always diffused so that the sharp shadows can be replaced with aesthetically pleasing soft shadows. Both of these lights are usually positioned at a 45 degree angle on the Z Axis and are placed high above the subject. 

The third type of light is the backlight. The backlight is positioned right behind the subject and can be used in a few different ways. If the subject has a dark backdrop, the backlight can be used to shine light towards the background, creating a very pleasing backdrop that defines the subject and makes it stand out from the background, just like how "bokeh" is created in a lens with a wider aperture. Another way to use it is by shining the backlight towards the subject and thus creating an outline of the subject. This method is called the "Rim Light".  Both are very commonly found in studios and each serve their own purpose. Lighting the background with the backlight is a good way of defining a human character from the backdrop and gives a very professional and clean look. 

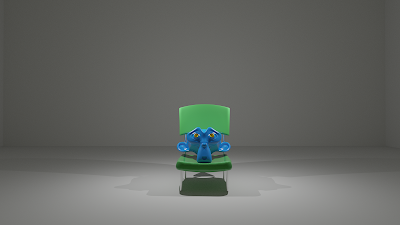
The room was darkened so that we could use our phone torches to light the model and take interesting photos. We used a 1-point lamp system, a 2-point lamp system and a 3-point lamp system. One tiny detail I should tell is that I was the model in this case. I wasn't able to take any photos of my own but I simulated whatever happened in the class by making 3D renders in Blender 2.8


This was the 1-point lamp system. It was fairly simple. I imported my 3D Models from previous projects, created a plane mesh, increased its scale and extruded the edges to resemble a room studio. The Point Lamp's size and radius was decreased so that I can ensure those harsh edges on the shadows. The wattage was 50 watts.


The two-point lamp system was also simple. I duplicated the key light, placed both on opposite ends of the monkey head and it created a rather unique shadow. Lighter shadows can be seen on opposite ends of the chair and the darker shadow can be seen right below the chair with no angle. As for the monkey, lighting can be seen on both ends of the head but a very dark shadow line down the middle.


The three-point lighting system took the longest to render because of how many light bounces were occurring in different areas of the frame. The key light is in the same position as it was in the 1-point lamp system, I added an area lamp with 45 watts and a wide radius as the Fill Lamp. The large scale of the area lamp and the lower wattage gave softer shadows and did not create any significant reflection on the right side of the monkey head. The backlight was very soft but it did create a soft outline around the chair if you look closely. I just duplicated the key light and reduced its wattage to 30 watts.